News
How to Choose a Solar Energy Light Pole?
Choosing a solar energy light pole is not simply a matter of selecting the brightest fixture. It requires matching solar generation, battery storage, lighting performance, and local weather conditions. The International Renewable Energy Agency reported more than 1.4 terawatts of global solar photovoltaic capacity by the end of 2023. This growth supports solar lighting, but it does not remove the need for careful site design.
A reliable selection begins with location. Check winter sunlight, shading, temperature, rainfall, and required nightly operating hours. A pole beside tall buildings may receive less useful solar energy than a nearby open site. The battery must support several cloudy nights, not only one clear evening. The International Energy Agency expects solar PV to lead renewable capacity expansion through 2030, yet every installation still faces local limitations. Global trends cannot replace a site survey.
Light quality matters as much as energy supply. Review lumen output, beam distribution, glare control, color temperature, and mounting height. The U.S. Department of Energy notes that LED lighting can use at least 75% less energy than incandescent lighting and last far longer. However, a high lumen rating may hide poor roadway coverage. Bigger is not automatically better. Standards such as IES RP-8 and relevant local road-lighting requirements can guide illumination decisions. Product datasheets should state battery chemistry, photovoltaic power, autonomy, ingress protection, wind resistance, and warranty terms. No sizing rule is perfect. A thoughtful design leaves room for maintenance, unusual weather, and honest performance checks after installation.
What Is a Solar Energy Light Pole?
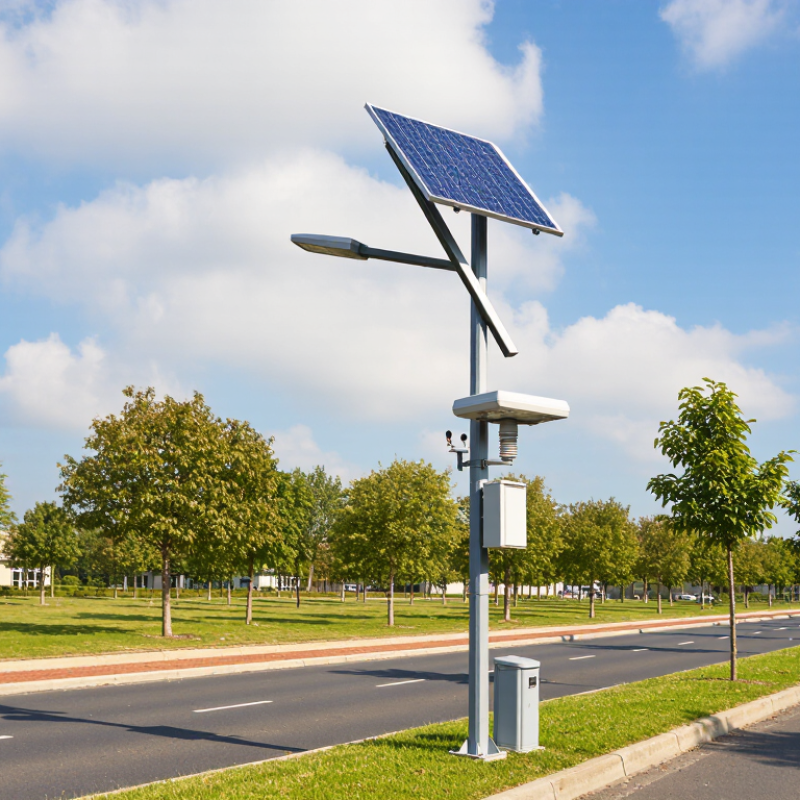
A solar energy light pole is an outdoor lighting system powered by sunlight. It combines a photovoltaic panel, rechargeable battery, LED lamp, controller, and strong pole. During the day, the panel converts sunlight into electricity. The battery stores that energy for nighttime use. After dusk, the controller activates the lamp automatically. There is no underground power cable in the basic setup. This makes installation practical for roads, parks, paths, farms, and remote areas. However, the pole still needs careful planning. Shade from trees or nearby buildings can reduce charging performance.
Tips: Check the local sunlight pattern before choosing a pole. A location with six hours of direct sun may perform better than a brighter-looking area with afternoon shade. Match the battery capacity with the required lighting hours. Review the panel angle, pole height, wind resistance, waterproof rating, and LED brightness. Ask for measurable test data, not only attractive claims. A motion sensor can reduce energy use in quiet areas, but it may feel inconvenient on busy paths.
From field observations Drainage and battery access matter more than many buyers expect. Dusty panels need occasional cleaning, especially near unpaved roads. Batteries also lose capacity over time. I once focused too much on brightness and overlooked maintenance access. That was a costly oversight. Reliable selection depends on climate, pedestrian activity, winter sunlight, and local repair conditions. A slightly lower lamp output may provide steadier lighting throughout the night.
How to Assess Lighting Needs and Installation Conditions
How to Choose a Solar Energy Light Pole?
Before choosing a solar energy light pole, define what the area must support. A pedestrian path needs different lighting from a parking entrance. Record operating hours, traffic levels, and locations where people may pause. Measure existing brightness with a calibrated lux meter when possible. A photometric plan can reveal dark gaps that look harmless during daytime. I once trusted a visual inspection and missed shadows near a boundary wall. That mistake reminded me to check the site at night.
Installation conditions matter just as much. Inspect sunlight across different seasons, not only on a clear afternoon. Nearby trees, buildings, and roof edges may shade the panel later. Check soil stability, drainage, wind exposure, and underground utilities before selecting the foundation. The pole should remain accessible for battery inspection and panel cleaning. Confirm local lighting, structural, and electrical requirements with qualified professionals. These details can change the suitable pole height, panel angle, battery capacity, and spacing.
Tips: Mark shaded areas on a simple site map. Observe the location after rain. Test the darkest points. Leave room for maintenance equipment. Do not assume more brightness always improves safety; glare can reduce visibility. A trial installation may expose problems that calculations overlook. Seasonal review is still worthwhile.
| Assessment Factor | What to Assess | Typical Planning Reference | Recommended Selection or Design Action | Installation Check |
|---|---|---|---|---|
| Lighting Application | Identify whether the area is a local road, pathway, parking area, residential street, campus, park, or security zone. | Required illuminance varies by traffic volume, pedestrian activity, safety requirements, and local regulations. | Select the lighting class before choosing the luminaire output. Avoid sizing the system only by wattage. | Confirm the project requirements with the applicable local lighting standard and authority. |
| Target Illuminance | Determine the average horizontal illuminance required at ground level and the acceptable uniformity. | Low-use paths may require approximately 3–10 lux; residential roads and parking areas commonly require approximately 5–20 lux. Exact values depend on the applicable standard. | Use a photometric layout to verify average illuminance, minimum illuminance, glare, and uniformity. | Check that trees, parked vehicles, walls, and nearby buildings will not create excessive dark areas. |
| Illumination Area | Measure road width, pathway width, parking-bay arrangement, intersection areas, and locations requiring higher light levels. | Lighting coverage is determined by mounting height, beam distribution, pole spacing, and required uniformity. | Choose a narrow, medium, or wide beam distribution according to the area geometry. | Place poles to avoid light being blocked by structures or directed into windows and neighboring properties. |
| Pole Height | Assess the required mounting height in relation to road width, pole spacing, glare control, and wind exposure. | Small pathways often use approximately 3–6 m poles; roads and larger open areas may use approximately 6–12 m poles. | Use a higher pole for wider coverage only when the luminaire optics and structural design support it. | Verify foundation depth, underground utilities, overhead lines, and access for installation equipment. |
| Pole Spacing | Estimate the distance between poles and check for dark zones between adjacent light distributions. | A preliminary spacing-to-mounting-height ratio is often about 2.5:1 to 4:1, but photometric verification is required. | Adjust spacing based on the actual light distribution, road width, required uniformity, and pole arrangement. | Review both staggered and single-side layouts where road width or obstructions make regular spacing unsuitable. |
| Solar Resource | Evaluate monthly peak sun hours, seasonal cloud cover, shading, latitude, and panel orientation. | Solar resource varies by location and season; annual averages must not replace the lowest-sunlight-period assessment. | Size the photovoltaic module using the worst or design-critical solar month rather than the annual average alone. | Keep the module free from shadows during the main solar collection period, normally around late morning to mid-afternoon. |
| Required Nightly Runtime | Define the time the light must operate each night and whether dimming or motion-based control will be used. | Common operating requirements are approximately 10–12 hours per night, depending on latitude and local sunset conditions. | Use a controller with programmable schedules, dimming profiles, or motion sensors when the application permits energy reduction. | Confirm that the control schedule matches the actual sunset, sunrise, traffic, and security requirements. |
| Autonomy Requirement | Determine how many consecutive low-sunlight nights the system must operate without sufficient solar charging. | Approximately 2–5 nights of autonomy is commonly considered during preliminary design; local weather conditions may require more. | Increase battery capacity, reduce lighting load, or use adaptive dimming when longer autonomy is needed. | Provide adequate ventilation or thermal protection according to the battery technology and enclosure design. |
| LED Load and Efficiency | Assess luminaire power, optical efficiency, efficacy, operating hours, and dimming losses. | Modern outdoor LED luminaires commonly provide approximately 100–180 lumens per watt, depending on the complete luminaire design. | Choose the lowest electrical load that achieves the required photometric performance, rather than selecting the highest wattage. | Confirm thermal management, ingress protection, surge protection, and expected lumen maintenance. |
| Battery Capacity | Calculate energy required for nightly operation, autonomy, temperature effects, depth of discharge, and system losses. | Basic energy demand can be estimated as: LED power × nightly operating hours. The battery must also cover conversion and reserve losses. | Use a battery management system and avoid routinely designing around the battery's full nameplate capacity. | Install the battery where flooding, excessive heat, physical impact, and unauthorized access are minimized. |
| Wind and Structural Load | Assess basic wind speed, exposure category, pole height, panel area, luminaire weight, and local structural requirements. | Wind design must follow the applicable national or regional structural code; a universal pole size is not suitable for every site. | Specify the pole, arm, bracket, foundation, and panel mounting system as one structural assembly. | Check soil bearing capacity, anchor-bolt arrangement, foundation dimensions, and corrosion protection. |
| Weather and Environment | Consider rain, snow, dust, salt spray, humidity, temperature range, flooding, and corrosive atmospheres. | Outdoor equipment is commonly selected with an enclosure rating appropriate to the exposure; coastal and dusty sites require additional protection. | Specify suitable corrosion-resistant materials, coatings, seals, drainage, and temperature-rated components. | Prevent water accumulation inside the pole, battery cabinet, controller housing, and cable entry points. |
| Glare and Light Spill | Evaluate viewing angles for drivers, pedestrians, residents, and nearby properties. | Glare control depends on mounting height, optics, tilt angle, shielding, and source luminance. | Use cut-off optics, appropriate shielding, accurate aiming, and lower output where excessive brightness is unnecessary. | Conduct a nighttime inspection after installation and correct unwanted light spill or direct glare. |
| Maintenance Access | Review cleaning, battery replacement, controller access, inspection frequency, and availability of service equipment. | Solar lighting systems should be inspected periodically for dirt, shading, corrosion, loose connections, and battery condition. | Select modular components and accessible enclosures to reduce service time and lifecycle cost. | Maintain safe clearance from traffic and provide a practical method for servicing elevated components. |
| Site and Regulatory Constraints | Check property boundaries, underground utilities, drainage, right-of-way limits, heritage restrictions, and permitting requirements. | Setback distances, foundation requirements, electrical rules, and light pollution limits vary by jurisdiction. | Complete a site survey and obtain required approvals before finalizing the pole position and system specification. | Mark utility routes and confirm that the pole does not obstruct sidewalks, emergency access, signs, or vehicle visibility. |
| Final System Verification | Verify lighting performance, charging behavior, battery reserve, controller settings, and structural stability. | Acceptance testing should compare measured results with the approved lighting design and applicable standards. | Document photometric results, operating schedule, component ratings, inspection records, and maintenance instructions. | Perform both daytime installation checks and nighttime illumination checks before handover. |

How to Compare Solar Panel, Battery, and Lamp Specifications
How to Choose a Solar Energy Light Pole?
When comparing solar street lights, read the panel, battery, and lamp as one system. A larger panel is not automatically better. Check its rated wattage, operating voltage, and performance under weak sunlight. A 200-watt panel may produce far less energy on a cloudy winter afternoon. Measure the installation site carefully. Nearby trees, buildings, and pole orientation can reduce daily charging time.
Battery specifications need equal attention. Compare usable capacity in watt-hours, not only amp-hours. A 12-volt, 100-amp-hour battery stores about 1,200 watt-hours before system losses. Check the permitted depth of discharge, operating temperature, cycle life, and protection controls. Lithium iron phosphate batteries often provide stable cycling, but their low-temperature charging limits still require attention. Ask for tested data, not attractive estimates. Real conditions are messier.
The lamp should be compared by delivered lumens, optical distribution, efficacy, color temperature, and dimming schedule. A high lumen figure means little if light spills outside the road. For a narrow walkway, a controlled beam may work better than a powerful floodlight. Check ingress and impact protection ratings, driver efficiency, and photometric reports. Then match nightly energy use with battery capacity and seasonal panel output. Leave reserve for several cloudy nights. I have seen projects fail after choosing brightness first and storage second. That mistake is easy to repeat.
How to Select the Right Pole Design and Control Features
How to Choose a Solar Energy Light Pole?
Selecting a solar light pole starts with the site, not the catalog image. Measure road width, mounting height, shadow patterns, and nighttime activity. A slim pole may look elegant, but it can feel unstable in strong coastal wind. Check the foundation design, material thickness, corrosion resistance, and local wind conditions. Galvanized steel suits many projects, while aluminum can reduce weight. The choice depends on load, exposure, and maintenance access.
Control features deserve equal attention. Use programmable dimming to provide full brightness during busy hours and lower output after midnight. Motion sensors can raise brightness when pedestrians or vehicles approach. Photocells should prevent daytime operation, even after cloudy mornings. Remote monitoring is useful for checking battery voltage, lamp status, and unexpected outages. However, wireless control can become unreliable where signal coverage is weak. Test it on site.
Keep the controls simple enough for maintenance staff to understand. A locked controller compartment protects settings, but it should open without specialized tools. Select a battery management system with overcharge and deep-discharge protection. Add surge protection in areas with frequent storms. I once focused too much on panel size and overlooked tree growth near the pole. That mistake reduced winter charging. Real conditions change. Leave adjustment space in the design, and inspect one complete installation after several weeks of operation.
How to Evaluate Costs, Maintenance, and Long-Term Performance
How to Choose a Solar Energy Light Pole?
Cost evaluation should begin with total ownership cost, not purchase price. Include the pole, photovoltaic panel, battery, controller, installation, transport, and replacement labor. IRENA reported that global solar photovoltaic electricity costs fell by 90% between 2010 and 2023. However, a lower component price does not guarantee lower street-lighting costs. Poor drainage, theft exposure, or weak foundations can create expensive site repairs. Measure winter sunlight, shadow patterns, soil conditions, and local labor rates before comparing quotations.
Maintenance determines whether projected savings survive real weather. Battery life often depends on temperature, cycling depth, and charging control. Ask for tested cycle data, operating-temperature limits, and replacement procedures. NREL’s widely cited degradation review found a median photovoltaic module degradation rate near 0.5% annually. That figure is useful, but it does not predict battery aging. Keep service records, including nighttime runtime, charging voltage, and fault alerts. Small data gaps can become costly assumptions.
Tips:
- Request a five-year cash-flow model.
- Price one battery replacement.
- Check illumination after three cloudy nights.
- Inspect cable seals and pole corrosion twice yearly.
- Use independent photometric testing when safety matters.
A spreadsheet can still lie. Long-term performance should be judged against measured light levels, not promises. A practical pilot installation may reveal uneven lighting, difficult access, or maintenance delays before a full deployment. That lesson is easy to miss.